Building a chatbot has become a hot skill, and with the release of ChatGPT we see a huge number of chat applications being released. At the root of all of these applications live Large Language Models - the engine of the generative AI train. But this beast must be tamed - and that’s not always an easy task.
What are LLMs?
Large Language Models, such as OpenAI's ChatGPT, Anthropic's Claude or open-weight models such as Mixtral 8X7B, are an advanced form of artificial intelligence algorithm that processes, generates, and understands human language.
LLMs are built upon deep learning techniques, particularly transformer neural networks, and are trained on vast datasets comprising diverse text sources.
LLMs are capable of various language-related tasks, including translation, summarization, question-answering, and creative writing.
Their large scale and extensive training enable them to generate contextually relevant, coherent, and often highly nuanced text outputs, making them valuable tools in natural language processing (NLP) applications.
Challenges in Building Chatbots with LLMs
Since LLMs are now such an integral piece of the puzzle, there are several challenges we need to tackle in order to productionize a langchain chatbot:
- Grounding - By default, LLMs can produce responses that may have nothing to do with objective reality. We call these responses “hallucinations” - they may seem real and even convincing, but they might be entirely wrong. We need to come up with some mechanism that will ground the conversation in some source of truth we can trust.
- Query limits - When we combine existing knowledge with the context, we often hit against the query limits set by the LLM provider (e.g. OpenAI)
- Conversational memory - LLMs are stateless, which means they have no concept of memory. That means that they don’t maintain the chain of conversation on their own. This may cause the conversation to feel pretty frustrating for users. We need to build a mechanism that will maintain the conversation history that will be part of the context for each response we get back from the chatbot.
- Multiple users - Our chatbot could be interacting with multiple users in real time. That means we need to maintain separate conversational memory and context for each conversation.
How Langchain and Pinecone work together
There’s a wave of tools created specifically to make it easier for developers to work with LLMs in the context of creating conversational agents. Perhaps the best known of these tools is Langchain. It allows us to easily define and interact with different types of abstractions, which make it easy to build powerful chatbots. Together with Pinecone, it allows us to build a knowledge base that our bot can interact with and respond to the user with contextually accurate information.
How to build a JavaScript chatbot using Langchain and Pinecone: A step-by-step chatbot tutorial
In this example, we’ll imagine that our chatbot needs to answer questions about the content of a website. To do that, we’ll need a way to store and access that information when the chatbot generates its response. That’s where the knowledge base comes in. The knowledge base is a repository of information that can be queried by our chatbot. We will need to access this information semantically, and we’ll use an LLM to get embeddings for our textual data and store it in Pinecone. The textual data in our case will come from a website which we’ll crawl regularly. After creating our index, our chatbot will be able to leverage to ground its answers in the relevant content to the user’s prompts.
Prerequisites
- We assume you’re familiar with Next.JS or have a good understanding of Javascript.
- This demo uses a collection of amazing services, and you’ll need to open free accounts in order to use the demo without modification:
Chatbot architecture
At a very high level, here’s the architecture for our chatbot:

There are three main components: The chatbot, the indexer and the Pinecone index.
- The indexer crawls the source of truth, generates vector embeddings for the retrieved documents and writes those embeddings to Pinecone
- A user makes a query to the chatbot
- The chatbot queries Pinecone for the source of true
- The chatbot responds to the user.
Let’s take a deeper look at the Indexer:
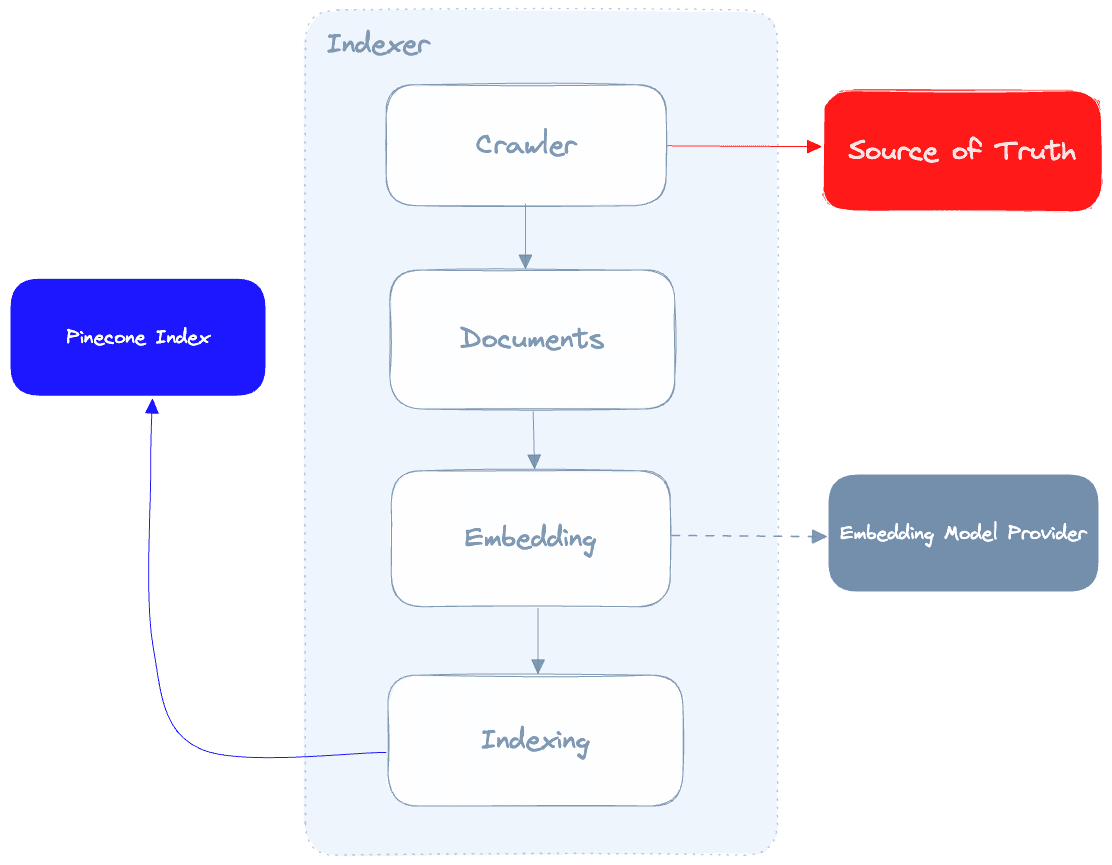
The indexer’s role is to crawl our source of truth, call the embedding model provider to generate embeddings for each document and then index those documents in Pinecone. One important detail to mention here is that the quality of the data we get from our crawler will directly affect the quality of the results our chatbot produces, so it’s critical that our crawler is able to clean up the fetched data from our source of truth as much as possible.
Next, here’s our chatbot itself:
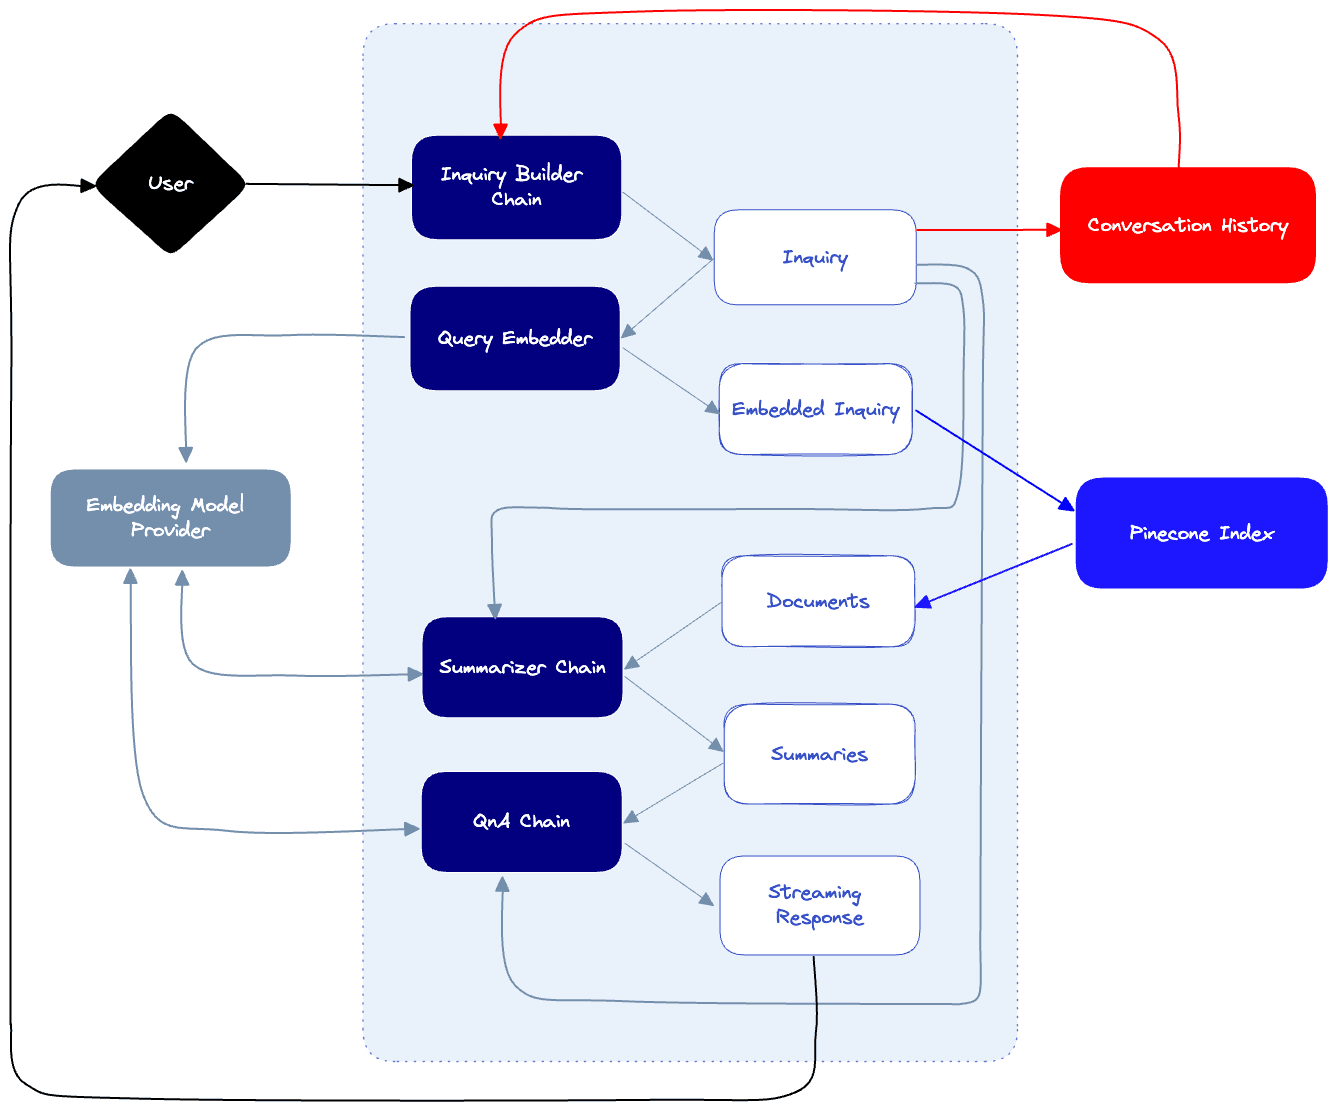
- When the user sends a prompt, we’ll pass it to the Inquiry builder chain which will produce an inquiry that is based on the conversation history. This will ensure that our queries downstream take into account questions that the user already asked. For example, if the user asked: “Where can I buy a computer?” and then follows up by “How much will it cost?”, the inquiry builder will know to interpret the user’s intent by formulating the final inquiry “How much will the computer cost?”.
- Whenever a new inquiry is created, we save it in our conversation history log.
- When an inquiry is resolved, it will be used to query the Pinecone index which is populated by documents inserted by our indexer. This will result in a number of potential hits, each with a corresponding document from our source of truth.
- Since these documents are most likely to be long, we’ll use a summarizer chain to summarize long documents and produce a finalized summarized document that will be the used to compose the final answer. The summarizer will be aware of the inquiry and attempt to maintain as much relevant information to that inquiry as possible.
- Finally our QnA chain will combine the summarized document, the conversation history and the inquiry to produce a final response to the user’s prompt.
We still have to address our multi-user strategy: we need to ensure that users interacting with our chatbot don’t contaminate each other’s conversational memories, and that responses are streamed back from the chatbot to the user that originated the conversation.
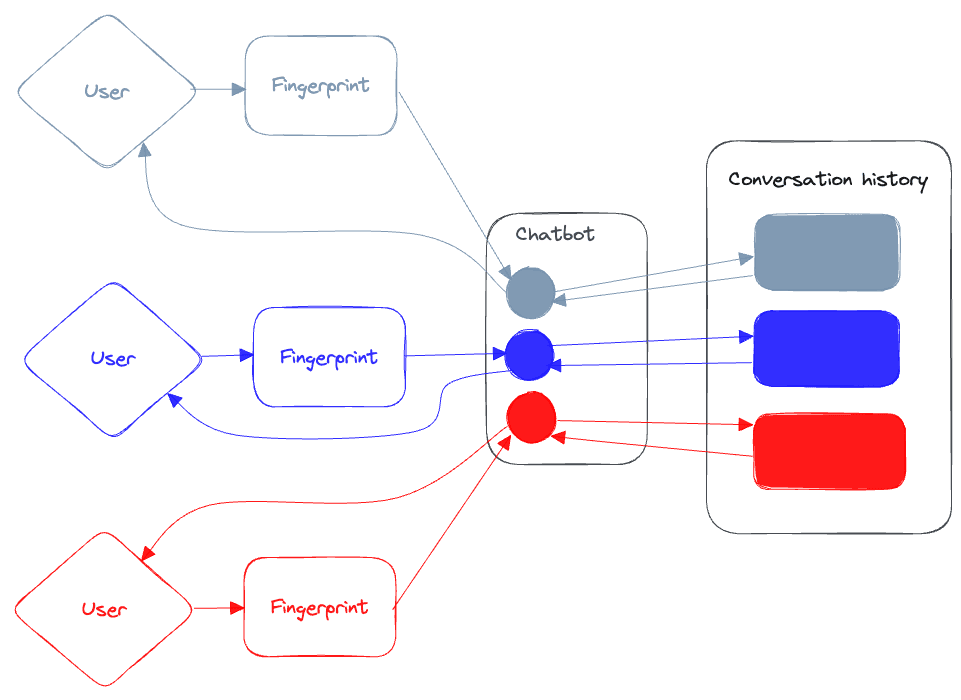
Since we’re not going to require authentication for every user that connects to our chatbot, we’ll resolve some unique ID (Or “Fingerprint”) that will help us identify users based on their browser. Our chatbot will use this unique ID to save the conversation history for each user using that key to separate them out from each other. It’ll also use the ID to stream back our responses from our chatbot over a unique (and resilient) streaming channel.
Using Langchain for Conversational Memory
As we mentioned before, Langchain provides a collection of very helpful abstractions that make our lives easier when we build LLM based applications. To build a “chain” in Langchain, we need a model and a prompt. The prompt will be what is sent to the model when we query it, and Langchain gives us a helpful formatting utility called the PromptTemplate:
import { PromptTemplate } from "langchain/prompts";

const template = "What sound does the {animal} make?";
const prompt = new PromptTemplate({
  template: template,
  inputVariables: ["animal"],
});
Langchain also makes it very easy to interact with LLM providers like OpenAI. Here’s how we define a model using OpenAI as a provider:
import { OpenAI } from "langchain/llms";
const llm = new OpenAI();
Here’s how we use this prompt template and the model to produce a chain:
import { LLMChain } from "langchain/chains";
const chain = new LLMChain({ llm, prompt });
To invoke the chain, we use the call method:
const response = await chain.call({ animal: "cat" });
console.log({ response });
As you’ll see, this very simple paradigm of templating our prompts before very powerful when we combine a series of chains together.
While Langchain provides many types of conversational memory utilities, it doesn’t natively handle dealing with multiple users interacting with the same chatbot. We want the user to be able to interact with our knowledge base and ask it questions, without the chatbot loosing the thread of the conversation – and without polluting other threads with irrelevant information from other users interacting that with it. So for that purpose, we’ll build our own conversational memory utility that does something very similar to what Langchain does. More on that later in the post.
Chatbot Development
Time to build this thing! We’re not going to review every line of the code - for that, you can review this repository. Instead, we’ll focus on the pertinent parts of the code that take some explaining.
Indexer
As we mentioned above, the indexer starts with the crawler. We use node-spider and cheerio to crawl our target url. Whenever we fetch a page, we parse it and find all the href elements in it - and if they are part of the same root domain, we queue them for to be downloaded. Since we’re planning to use the content for semantic search, we want to do away with all the HTML and preserve just the content. For that purpose, we use the turndown library which helps us convert HTML to markdown.
// Instantiate the crawler
const crawler = new Crawler(urls, 100, 200);
// Start the crawler
const pages = (await crawler.start()) as Pages[];
At the end of the crawling process, we an array of pages, each containing the markdown content of the page, it’s URL, and it’s title.
Dealing with rate limits
The process continues with two steps: embedding and indexing, and both of them are rate limited in some ways. Let’s see how to ensure our embedder and indexer play nice with these rate limits.
Embedding
We want our chatbot to be able to query Pinecone using natural language, and get back semantically relevant information. To do that, we need to do four things:
- Break up the pages we crawled into small chunks
- Associate each chunk with it’s original text. Once we get a “hit” on that chunk, we want to be able to use the entire text to build our final answer.
- Create the vector embeddings for the chunked text.
- Since Pinecone allows us to save up to 40k of data in the metadata object, we need to truncate the original text if it’s too big.
First, we instantiate an OpenAIEmbedding instance using the gpt-3.5-turbo model. Then, we use Langchain’s RecursiveCharacterTextSplitter to split the pages into chunks.
const embedder = new OpenAIEmbeddings({
  modelName: "gpt-3.5-turbo",
});

const documents = await Promise.all(
  pages.map((row) => {
    const splitter = new RecursiveCharacterTextSplitter({
      chunkSize: 300,
      chunkOverlap: 20,
    });
    const docs = splitter.splitDocuments([
      new Document({
        pageContent: row.text,
        metadata: {
          url: row.url,
          text: truncateStringByBytes(row.text, 35000),
        },
      }),
    ]);
    return docs;
  })
);
The OpenAI API embedding endpoint is limited to 3,000 requests per minute. In order to ensure we’re not blowing past the limit, we use the Bottleneck library, which allows us to control the rate at which requests are made.
const limiter = new Bottleneck({
  minTime: 50,
});

const rateLimitedGetEmbedding = limiter.wrap(getEmbedding);
vectors = (await Promise.all(
  documents.flat().map((doc) => rateLimitedGetEmbedding(doc))
)) as unknown as Vector[];
The minTime parameter defines the minimal amount of time (in milliseconds) each request will take. By wrapping the getEmbedding function we now ensure the limiter controls the rate in which it is fired.
Upserting
Now that we have our embeddings, it’s time to upsert them into Pinecone. This operation is also rate limited - we have a maximum of 2MB of vectors we can send per upsert operation. Given that we’re packing a whole lot of metadata in each vector, we should chunk our vectors array before upserting.
const sliceIntoChunks = (arr: Vector[], chunkSize: number) => {
  const res = [];
  for (let i = 0; i < arr.length; i += chunkSize) {
    const chunk = arr.slice(i, i + chunkSize);
    res.push(chunk);
  }
  return res;
};

const chunks = sliceIntoChunks(vectors, 10);

await Promise.all(
  chunks.map(async (chunk) => {
    await index!.upsert({
      upsertRequest: {
        vectors: chunk as Vector[],
      },
    });
  })
);
And that’s it! Our crawler is ready. To run the crawler, and assuming we created our Pinecone index, we simply need to start the server and issue the following request:
GET https://localhost:3000/api/crawl?urls=url1,url2&limit=10&indexName=yourIndexNameWhen the request completes, our new embeddings would have been upserted to Pinecone.
Chatbot
We want our chatbot to be able to answer questions based on the information found in the documents we embedded and saved in Pinecone. In this portion of the post, we’ll see how to leverage Langchain to build a collection of “chains,” each improving the performance of our chatbot.
A large part of what we have to do here is what’s known as “prompt engineering," where we fine-tune the exact prompt that is sent to our chatbot in order to get the best response to our situation. Prompt engineering is more of an art than a science at this point, and there are no “right” answers for the most part. There a good practices, and a lot of tips and tricks we can apply - but the bottom line is that you’ll have to do your own finessing when it comes to the finding the specific prompt that will work for your situation.
As you saw in the architectural layout of our chatbot, we have the following steps:
- Inquiry builder - takes the user prompt, inject the conversation context and builds a final inquiry that takes the context into account
- Semantic document retrieval - we embed the inquiry and use it to query the documents indexed in Pinecone
- Summarization chain (optional) - in our specific case, the documents we retrieve from Pinecone are going to be too long to send to OpenAI to formulate a final answer (they most likely are more than 4000 characters long). In order to overcome this, we chunk and summarize these long documents while preserving content that’s important to us. For example, it’s important to use that code samples found in documents remain intact - so we’re going to tell our summarizer to keep them unmodified even after it summarizes their original text. That said, this step is not always required, and we might be able to see good results without summarizing the full version of the document and instead relying just on the indexed chunks.
- Final QnA Chain - we provide the summaries, the conversational history and the inquiry to the model to produce a final result.
User Based Conversational History
As we mentioned before, we want to make sure the conversation our user has with the chatbot is as natural as possible. In order for the chatbot to “understand” what was discussed already, we need to provide it with the conversation context. We’re using a simple SQL table (hosted on CockroachDB) to store each conversation entry:
public async addEntry({ entry, speaker }: { entry: string, speaker: string }) {
  try {
    await sequelize.query(`INSERT INTO conversations (user_id, entry, speaker) VALUES (?, ?, ?) ON CONFLICT (created_at) DO NOTHING`, {
      replacements: [this.userId, entry, speaker],
    });
  } catch (e) {
    console.log(`Error adding entry: ${e}`)
  }
}
To retrieve the conversation history, we use the following function which takes the most recent conversations (based on a limit) and returns them as an array of strings:
public async getConversation({ limit }: { limit: number }): Promise<string[]> {
  const conversation = await sequelize.query(`SELECT entry, speaker, created_at FROM conversations WHERE user_id = '${this.userId}' ORDER By created_at DESC LIMIT ${limit}`);
  const history = conversation[0] as ConversationLogEntry[]

  return history.map((entry) => {
    return `${entry.speaker.toUpperCase()}: ${entry.entry}`
  }).reverse()
}
We can now use this conversation history as part of the context to the various chains used by our chatbot.
Finessing the query
The user can use whatever prompt they’d like, and as we said before - because we want to maintain the conversation as natural as possible, we take the user’s raw prompt, combine it with the conversation history and finally produce an inquiry which will be focused on the knowledge base we’ve created.
In order to build the inquiryChain we first need a template. Here’s an example of what that might look like:
`Given the following user prompt and conversation log, formulate a question that would be the most relevant to provide the user with an answer from a knowledge base.
  You should follow the following rules when generating and answer:
  - Always prioritize the user prompt over the conversation log.
  - Ignore any conversation log that is not directly related to the user prompt.
  - Only attempt to answer if a question was posed.
  - The question should be a single sentence.
  - You should remove any punctuation from the question.
  - You should remove any words that are not relevant to the question.
  - If you are unable to formulate a question, respond with the same USER PROMPT you got.

  USER PROMPT: {userPrompt}

  CONVERSATION LOG: {conversationHistory}

  Final answer:`;
And this is how we call the chain:
const inquiryChain = new LLMChain({
  llm,
  prompt: new PromptTemplate({
    template: templates.inquirerTemplate,
    inputVariables: ["userPrompt", "conversationHistory"],
  }),
});
const inquirerChainResult = await inquiryChain.call({
  userPrompt: prompt,
  conversationHistory,
});

const inquiry = inquirerChainResult.text;
Aside: Prompt Engineering
Now that we’ve seen an example of working with prompts, let’s talk about prompt engineering - an emerging skill in and of itself.
Prompt engineering is the process of carefully crafting input queries or tasks to elicit the most accurate and useful responses from LLMs. While these models are incredibly powerful and versatile, they need a little guidance to truly get the job done correctly.
Prompt engineering involves three main components:
- Phrasing: We need to experiment with different ways of presenting our input queries. The goal is to find the perfect balance between clarity and specificity, ensuring that the LLM “grasps” exactly what we’re looking for.
- Context: We need to add context to our prompts to help the LLM “understand” the broader picture. This could involve providing background information, setting the stage for the desired response, or even gently nudging the model towards a particular line of thought. As we saw before, this is what we do to produce an inquiry that would be relevant to the previous prompts from the user.
- Instructions: We need to give the LLM clear and concise instructions. We need to specify the format you’d like the response to take or highlight any key points you’d like the model to consider. As you saw before, we did that by defining a list of instructions that defined to the LLM exactly how to format the inquiry and how to combine it with the prompt received from the user.
Prompt engineering is all about trial and error, a dance of iteration and optimization. As we fine-tune our prompts, we develop a deeper understanding of how to communicate effectively with the LLM, transforming it into a more reliable and efficient problem-solving tool.
Embedding the inquiry and querying Pinecone
Next, we embed the inquiry:
const embedder = new OpenAIEmbeddings({
  modelName: "text-embedding-ada-002",
});

const embeddings = await embedder.embedQuery(inquiry);
Next, we query Pinecone to retrieve the documents for our embedded inquiry. Here we make the query passing the includeMetadata: true parameter, then map over the results and cast the metadata as the Metadata type.
type Metadata = {
  url: string;
  text: string;
};

const getMatchesFromEmbeddings = async (
  embeddings: number[],
  pinecone: PineconeClient,
  topK: number
): Promise<ScoredVector[]> => {
  const index = pinecone!.Index("crawler");
  const queryRequest = {
    vector: embeddings,
    topK,
    includeMetadata: true,
  };
  try {
    const queryResult = await index.query({
      queryRequest,
    });
    return (
      queryResult.matches?.map((match) => ({
        ...match,
        metadata: match.metadata as Metadata,
      })) || []
    );
  } catch (e) {
    console.log("Error querying embeddings: ", e);
    throw new Error(`Error querying embeddings: ${e}`);
  }
};
What we get back from this function is an array of ScoredVectors. We’ll extract the urls and document text from the metadata for each of these matches, and pass them to our summarizer.
Summarization
At the moment, OpenAI has an upper limit of 4,000 tokens per request (this will change with the release of GPT-4, with limits of 8,000 and 32,000 for some of OpenAI’s offerings). So we’re in a bit of a pickle: On the one hand, we want the context used by the chatbot to produce it’s final answer to be as detailed as possible, but we can’t pass all the raw documents that we found in our Pinecone query. The solution is to summarize the raw documents while preserving the important bits of information found in each document we summarize.
To do this, we start by combining all the documents we retrieved from Pinecone together, and then chunking them into even sized chunks of up to 4000 tokens. We summarize each chunk, and combine them together. If the resulting summarized document is still too long, we continue to recursively summarize it.
const summarizeLongDocument = async (
  document: string,
  inquiry: string,
  onSummaryDone: Function
): Promise<string> => {
  // Chunk document into 4000 character chunks
  try {
    if (document.length > 3000) {
      const chunks = chunkSubstr(document, 4000);
      let summarizedChunks: string[] = [];
      for (const chunk of chunks) {
        const result = await summarize(chunk, inquiry, onSummaryDone);
        summarizedChunks.push(result);
      }

      const result = summarizedChunks.join("\n");

      if (result.length > 4000) {
        return await summarizeLongDocument(result, inquiry, onSummaryDone);
      } else return result;
    } else {
      return document;
    }
  } catch (e) {
    throw new Error(e as string);
  }
};
To summarize each chunk, we create a new “chain”, and apply it:
const summarize = async (
  document: string,
  inquiry: string,
  onSummaryDone: Function
) => {
  const chain = new LLMChain({
    prompt: promptTemplate,
    llm,
  });

  try {
    const result = await chain.call({
      prompt: promptTemplate,
      document,
      inquiry,
    });

    onSummaryDone(result.text);
    return result.text;
  } catch (e) {
    console.log(e);
  }
};
And here’s the prompt that tells our LLM to preserve the information that’s important to us (in this case, it’s code):
`Shorten the text in the CONTENT, attempting to answer the INQUIRY. You should follow the following rules when generating the summary:
  - Any code found in the CONTENT should ALWAYS be preserved in the summary, unchanged.
  - Code will be surrounded by backticks (\`) or triple backticks (\`\`\`).
  - Summary should include code examples that are relevant to the INQUIRY, based on the content. Do not make up any code examples on your own.

  - If the INQUIRY cannot be answered, the final answer should be empty.
  - The summary should be under 4000 characters.

  INQUIRY: {inquiry}
  CONTENT: {document}

  Final answer:
  `;
Answer construction Prompt
At the end of the summarization process, we’ll the following ingredients to build our final answer:
- Inquiry
- Conversation history
- Original URLs of the retrieved documents
- Summarized documents
We’re ready to build our final chain. Instead of waiting for the entire answer to be received, we want our response to be streamed to the user token by token, so we’re going to use the ChatOpenAI class – it allows us to define a CallbackManager that handles streaming events.
const chat = new ChatOpenAI({
  streaming: true,
  verbose: true,
  modelName: "gpt-3.5-turbo",

  callbackManager: CallbackManager.fromHandlers({
    async handleLLMNewToken(token) {
      // stream the token to the user
    },
  }),
});
Whenever a new token is received, we want to stream it back to the user. For that purpose, we’ll use Ably.
Aside: Why Ably?
Ably is a real-time data delivery platform that provides infrastructure and APIs for developers to build scalable and reliable real-time applications. It can be used to handle real-time communication, data synchronization, and messaging across various platforms and devices.
As our chatbot gains more users, the number of messages exchanged between the bot and the users will increase. Ably is built to handle such growth in traffic without any performance degradation.
Ably also ensures message delivery and provides message history, even in cases of temporary disconnections or network issues. Implementing this level of reliability using only WebSockets can be challenging and time-consuming.
Finally, Ably provides built-in security features like token-based authentication and fine-grained access control, simplifying the process of securing your chatbot’s real-time communication.
Setting up Ably
Setting Ably up on the API side is as simple as can be:
const client = new Ably.Realtime({ key: process.env.ABLY_API_KEY });Whenever we stream the token to the user, we’ll publish a message on the channel we assign to the user:
const channel = ably.channels.get(userId);
channel.publish({
  data: {
    event: "response",
    token: token,
    ...
  }
})
The Application
Fortunately for us, we don’t have to build a chatbot interface from scratch. Instead, we can use the well crafted Chat UI React Kit which offers all the necessary components for building a production grade chat application. It looks something like this:
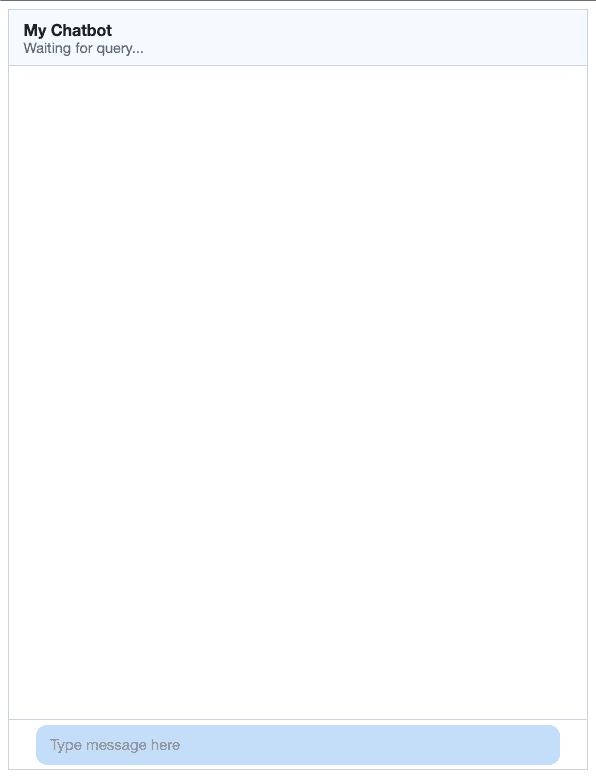
The full code listing can be found here. As you can see, we have a message box where the user can type their message. When they hit the enter key, the message will be sent. Under the chatbot’s name, we have a status box that will update whenever the chatbot wants to update the user of the activity it’s up to.
Handling incoming messages
To receive messages on the client, we first set up the useChannel effect provided by Ably:
import { useChannel } from "@ably-labs/react-hooks";

useChannel(visitorData?.visitorId! || "default", (message) => {
  switch (message.data.event) {
    case "response":
      setConversation((state) => updateChatbotMessage(state, message));
      break;
    case "status":
      setStatusMessage(message.data.message);
      break;
    case "responseEnd":
    default:
      setBotIsTyping(false);
      setStatusMessage("Waiting for query...");
  }
});
Whenever the bot sends us a status message, we’ll update the status panel.
That said, we still have to do some work to handle the incoming streaming data whenever our bot responds. As you can see, we save our conversation in a state object that has an array of ConversationEntry:
type ConversationEntry = {
  message: string,
  speaker: "bot" | "user",
  date: Date,
  id?: string,
};
Whenever a new message is returned from the chatbot, we need to update the conversation list appropriately. We basically have to “pluck” the last message from the state and continuously add to it.
const updateChatbotMessage = (
  conversation: ConversationEntry[],
  message: Types.Message
): ConversationEntry[] => {
  const interactionId = message.data.interactionId;

  const updatedConversation = conversation.reduce(
    (acc: ConversationEntry[], e: ConversationEntry) => [
      ...acc,
      e.id === interactionId
        ? { ...e, message: e.message + message.data.token }
        : e,
    ],
    []
  );

  return conversation.some((e) => e.id === interactionId)
    ? updatedConversation
    : [
        ...updatedConversation,
        {
          id: interactionId,
          message: message.data.token,
          speaker: "bot",
          date: new Date(),
        },
      ];
};
The final thing we have to do is to send the user’s request to our bot. When the submit function is called (when the enter key is pressed), we’ll add the user’s message into the conversation state object, and send the user’s message to the bot, alongside with the user’s unique identifier we get from Fingerprint.
const submit = async () => {
  setConversation((state) => [
    ...state,
    {
      message: text,
      speaker: "user",
      date: new Date(),
    },
  ]);
  try {
    setBotIsTyping(true);
    const response = await fetch("/api/chat", {
      method: "POST",
      headers: {
        "Content-Type": "application/json",
      },
      body: JSON.stringify({ prompt: text, userId: visitorData?.visitorId }),
    });

    await response.json();
  } catch (error) {
    console.error("Error submitting message:", error);
  } finally {
    setBotIsTyping(false);
  }
  setText("");
};
And with that our application is ready to go!
Langchain Javascript Chatbot Demo
To test the langchain chatbot example, I chose to run it on Pinecone’s own documentation. I first crawled https://docs.pinecone.io, and got the following results for my question:
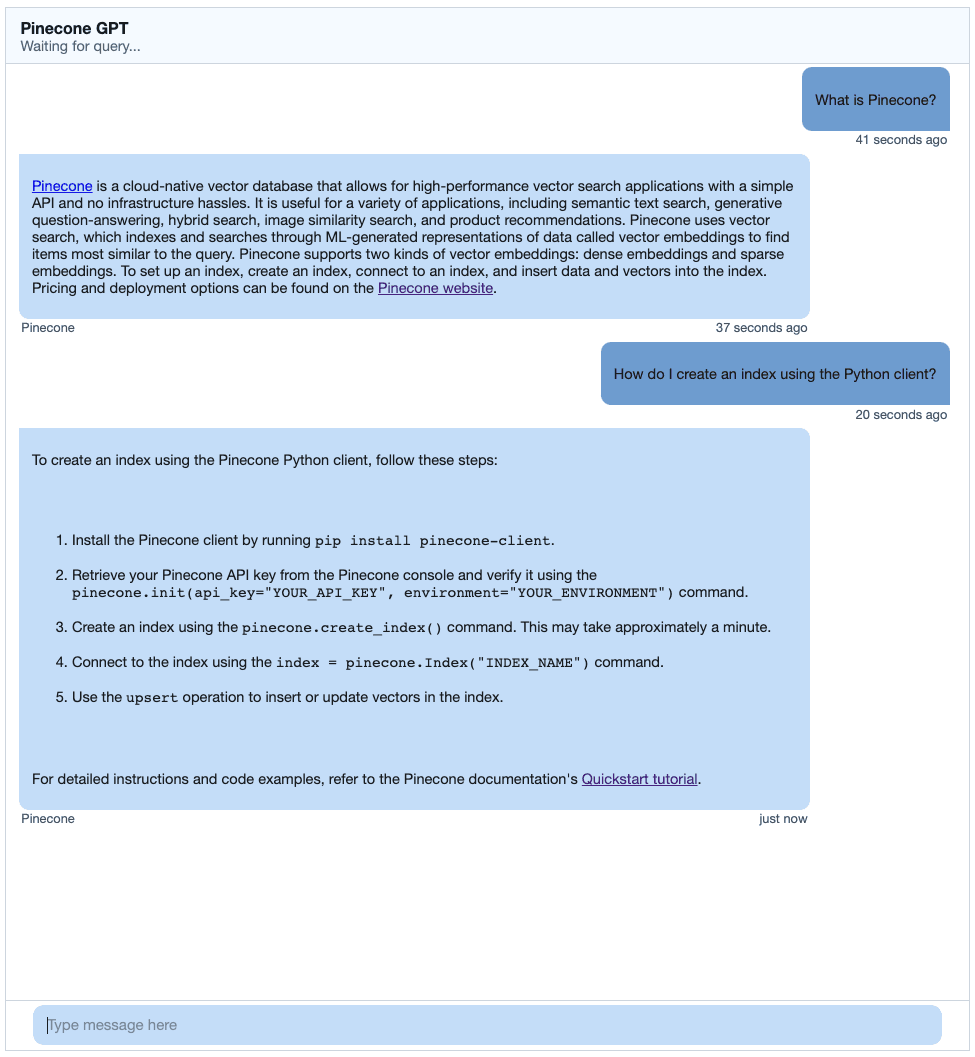
Looks pretty good!
Final Thoughts on building a chatbot using Langchain and Pinecone
The chatbot and LLM space is rapidly changing. OpenAI has just announced GPT-4 and its new limits, which may change the way this and other applications approach summarization and other tasks. The JS/TS version of Langchain is continuously improving and adding new features that will simplify many of the tasks we had to craft manually.
With that said, the overall architecture for a conversational application like this will roughly be the same: We’ll always need to crawl, embed, and index our source of truth data to provide grounding for the chatbot. We’ll always need to create prompts that will help the chatbot understand the user’s intent and formulate the answer in the way we want it to be provided to the user.
We encourage you to make the most of the ongoing advancements in this space with tools like Pinecone and Langchain. Use this post as a starting point to create conversational applications that engage users and keep them coming back for more!